|
|
Celestron CPC Deluxe Edge
1100HD Thermal Modifications and Wavefront Analysis
Wade Van Arsdale
Little Rock, AR., USA
December 17th, 2011
|
|
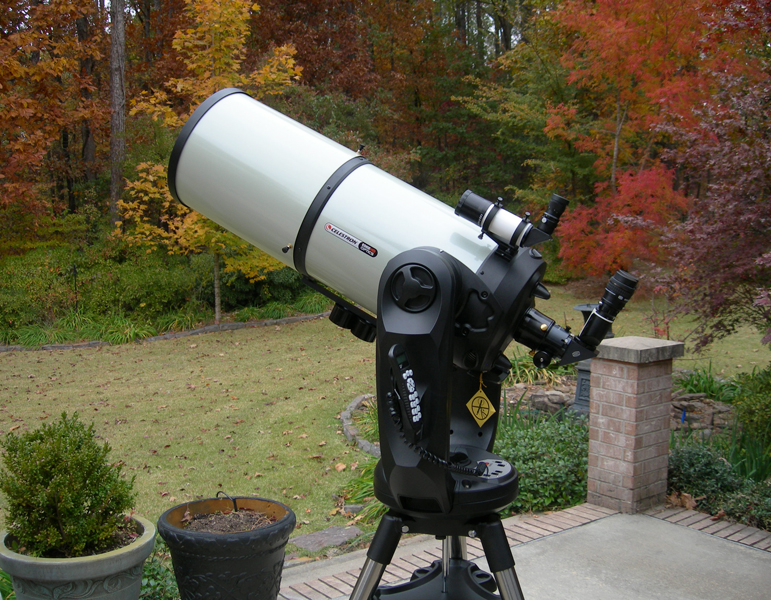
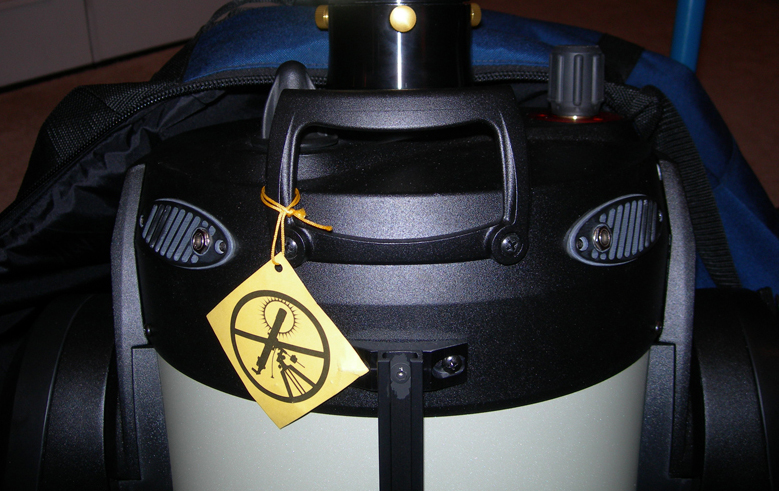
(Shown above with AstroZap Aluminum Dewshield)
See earlier test results and modifications to this OTA here.
Synopsis:
This round of tests used an initial front-fan cooldown of 30 minutes through the Fastar cell with a Starizona CoolEdge high-CFM filtered fan. After 30 minutes, the front fan was removed and continuously-run TEMP-est dual rear collar fans from DeepSpaceProducts.com were used for the duration of the test-imaging and visual checks. There is a significant and consistent improvement in image stabilization seen visually and with the webcam during star testing when using this combination of cooling fans. Internal felt flocking was also added to see if the initial thermal equilibrium gained from the front fan could be *maintained* for a longer period. For those not wanting to open the OTA to install flocking, a flexi-foam external wrap around the OTA would also work to retard runaway cooling in the aluminum OTA tube vs. the glass cooling rate. For serious planetary imaging and visual observations, it's critical to take steps to control the aluminum side-wall cooling and match its cooling rate more closely to the primary mirror's cooling rate. This lessens the amount of thermal imbalance as ambient temp drops through the night. It is this imbalance that creates the internal tube thermals that degrade wavefront quality at the focal plane.
I. Test #1-Roddier Wavefront Analysis With No Fans in Use:
Test Date: December 17th, 2011
OTA Tested: 2011 Celestron CPC Deluxe Edge 1100HD @ native focal length of
2800mm
Test Sequence:
1) Setup scope outdoors at sundown so that no direct sunlight can heat the
OTA.
2) Observe a passive cool-down time of 1 hour prior to commencing tests.
3) Take webcam images of in and out-focused star pattern for Roddier
analysis.
Test Site: Little Rock, AR., el. 350 ft.
Software used for the analysis: WinRoddier English Ver. 2.2, as posted to the
Yahoo Roddier user group by Mark Crossley
Skies: Clear
Seeing: 7 out of 10
Transparency: 9 out of 10
Temperature: 45 degrees F, dropping to 40 degrees F during the 1-hour
duration of the OTA testing
Dewpoint: 35 degrees
Winds: Calm
Roddier Test camera: Lumenera SKYnyx 2-2C webcam with Baader IR/UV cutoff filter @
640 x 480 image size, 26 fps capture rate for 1000 frames, and resolution
of 0.23 arc-sec/pixel, @ native focal length of 2800mm (f/10)
Reference
Chart for Strehl Values and P-V Wavefront Errors.
Chart courtesy of R.F.
Royce Precision Optical Components:
|
Commonly Encountered Wavefront Relationships |
||||
| P-V Fraction | P-V Decimal | Marechal RMS* | Strehl Ratio | Comments |
| 1/3 | .333 | .094 | .71 | |
| 1/4 | .250 | .071 | .82 | Rayleigh Limit |
| 1/5 | .200 | .057 | .88 | |
| 1/6 | .167 | .047 | .92 | Good |
| 1/7 | .143 | .041 | .94 | Very Good |
| 1/8 | .125 | .036 | .95 | Excellent |
| 1/9 | .111 | .032 | .960 (.96) | Excellent |
| 1/10 | .100 | .028 | .969 (.97) | Excellent |
| 1/11 | .091 | .026 | .974 | |
| 1/12 | .024 | .024 | .978 | "Super Apo" |
Roddier Results (as measured in the Green at approximately 550nm wavelength):
Summary: The
wavefront tested at a poor 0.868 Strehl, or slightly better than 1/4th
wave with no fans in use prior to
imaging.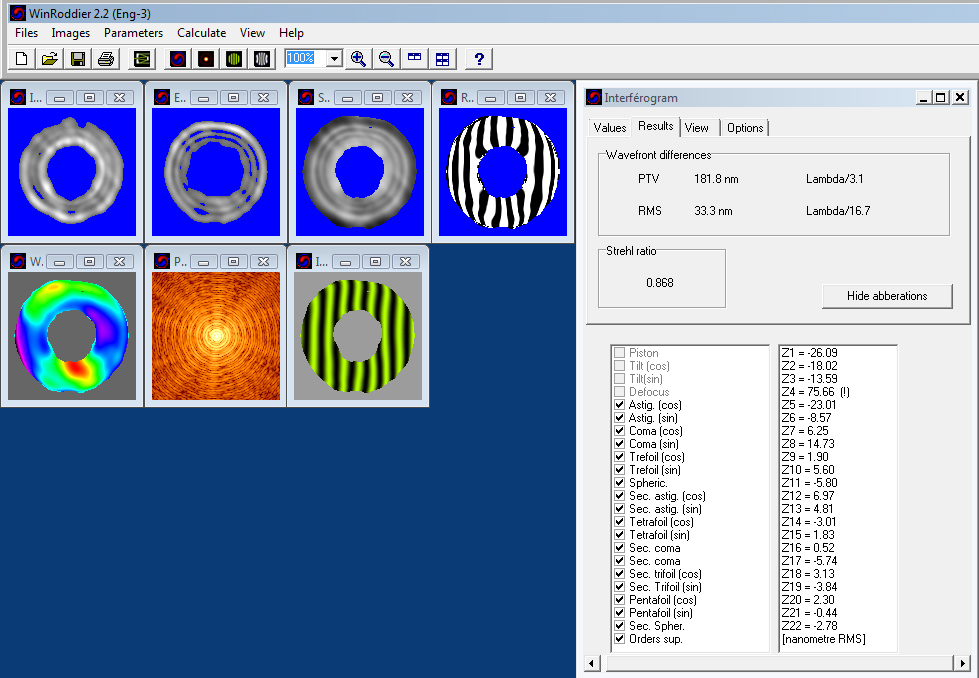 |
II. Test #2-Roddier Wavefront
Analysis With Front and Rear Forced-Cooling Fans in Use:
Test Sequence:
1) After the passive 1 hour cool-down time and Test #1 above were
completed, run the Starizona Cool-Edge front fan for 30 minutes.
2) Remove front fan, reinsert secondary mirror, and activate the two
pull-only rear collar fans. The CPC Edge 11 scope has three rear collar
vent fans. It was decided to use a rear-fan setup of two fans to pull air
through the one remaining unused vent and eject this air out the two fans.
It was surmised that this would create laminar flow behind the glass mirror
surface and a small air-pressure gradient inside the OTA that would help remove
any residual primary mirror heat pockets that may have remained during the front
cool-down. The rear fans should also be beneficial in keeping the OTA
stable once the more powerful front fan has been used to equalize the scope initially.
3) Run the rear fans for 10 minutes prior to beginning the test.
Keep running them for the duration of the test to assess for any vibration
effects, thermal degradation inside the OTA, or other problems.
4) Take webcam images of the in and out-focused star patterns for Roddier
analysis.
Roddier Results with Forced Fan Cooling Used (as measured in the Green at approximately 550nm wavelength):
Summary: The
wavefront tested at a very good and much-improved 0.935 Strehl , or
between 1/6th and 1/7th wave accuracy after using the front and rear fans
to stabilize the OTA. This is a significant improvement over the
1/4th wave result seen in the first test above. This amount of
improvement should be readily detectable at the eyepiece or camera's focal
plane during high-magnification planetary work.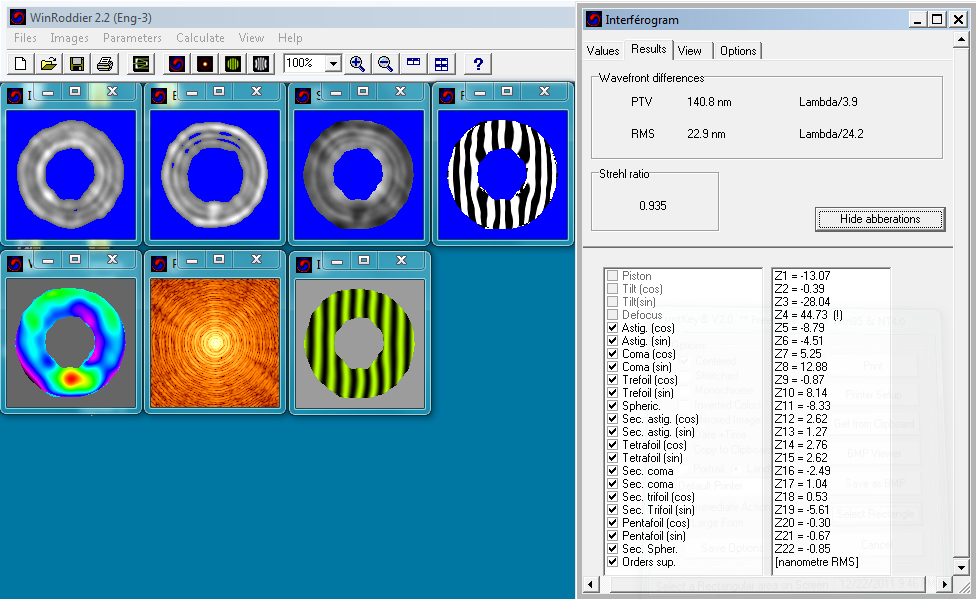 |
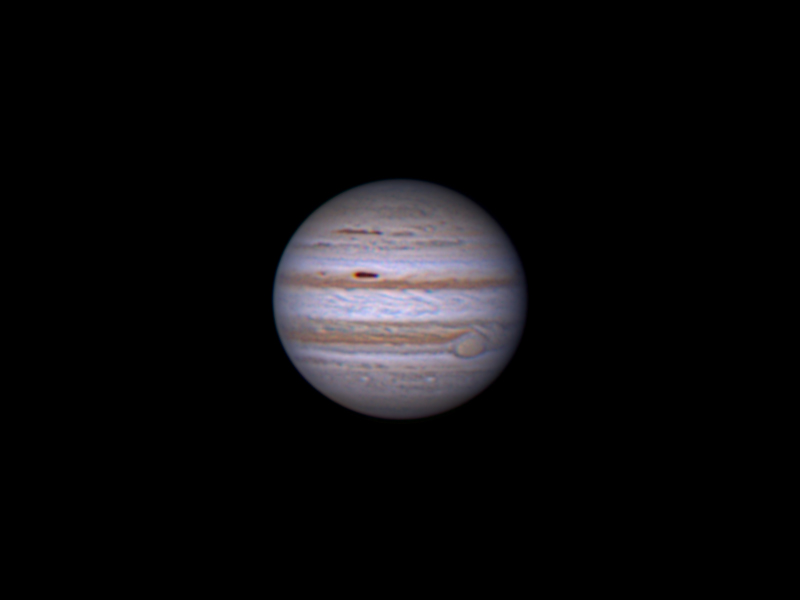
III. Test #3: Test Image of Jupiter With Rear Fans Running Continuously While Exposing:
Test
OTA: 2011 Celestron CPC Deluxe Edge 1100HD
@ f/10, for a native focal length of 2800mm.
Test camera: Point Grey Imaging Flea-3 webcam, FlyCap-2 capture software,
Starlight X-Press filter wheel.
Stacking with
AVI-Stack2, Registax Ver. 6 wavelets, Adobe Photoshop CS2 post-processing.
1000 exposures each with Red, Green, and Blue Astronomik filters @ 640 x 480 frame
size. 2.5 micron camera pixel size for a resolution of 0.18 arc-sec per
pixel.
 |
IV. Visual Checks for Wavefront Stabilization:
Test
Object: Jupiter
Test Telescope: 2011 Celestron CPC Deluxe Edge 1100HD
@ native focal length of 2800mm
Visual Back Setup: Baader Maxbrite Binoviewer with two Baader Hyperion
13mm Eyepieces @ 215x.
Test Scenario: Turn rear fans off, wait 10 minutes, then observe Jupiter
through the eyepiece at focus. Then turn rear fans back on, let them run
continuously, and after waiting another 10 minutes, repeat the observation of
Jupiter. Repeat this scenario for a total of 3 complete test cycles.
Summary of Visual Check
Results:
With
no rear fans in use and after 30 minutes of front-fan cooling followed by a 30
minute break with no fans, a slow-rolling, very pronounced thermal swim across
Jupiter's disk had already returned from the fast-dropping ambient temp. A
rapid change in ambient temp was already causing OTA destabilization and
regeneration of tube thermals, even with felt flocking installed inside the
OTA. After turning on the rear fans and waiting 10 minutes, then observing
Jupiter, this slow-rolling large ripple effect had been replaced by a much
lower-amplitude fast-cycling very minor ripple across the disk of Jupiter that
did not degrade seeing or contrast on Jupiter's disk nearly as much as the
larger thermal effects seen without the rear fans. This smaller ripple was
basically only noticed along the planetary limb edges. These
faster-cycling, smaller ripples were likely just the atmospheric seeing from the
overhead air mass which was of good quality for the duration of the test
session. The overall improvement from the rear fans reducing the internal
OTA thermals was seen consistently across all three test cycles.
I could not detect any vibration effects from the rear fans in the eyepiece or
webcam views of Jupiter. "Maglev" fans are used for the
DeepSpaceProducts.com TEMP-est fans. This type of fan design tends to
produce much lower vibration than ball-bearing or sleeve motor designs.
The fact that these maglev fans don't cause detectable vibration at the eyepiece
is crucial. This allows for the fans to be run all night intermittently
when observing
or imaging with no detrimental effects and provides a very effective way to reduce internal OTA thermals and
improve wavefront quality for serious planetary work.
One word of caution about leaving the fans on non-stop all night long. If the outdoors dew point is very close to the ambient outdoors temp, and you cool the inside of the OTA and the glass all the way down to this ambient temp over several hours, you may get frost or dew formation on the inside of the tube and mirror glass surfaces. So in very cold temps, be aware of this effect from "too much of a good thing"! Likewise, dewstrip use may set up the same temperature imbalance between glass and aluminum with the rear fans left running, but in reverse from the normal imbalance seen without heating accessories. The trick is to keep the aluminum wall and glass temps fairly close to the same. This is what kills the internal thermals that damage the wavefront accuracy. So you may find as the night goes along, you can just switch off the rear fans once the image stabilizes and the scope has been outdoors for several hours with ambient outdoor temp now stabilized about as low as it's going.
Installation of the rear fans was very easy to do, and does not require any tear-down of the OTA. All you have to do is remove two of the three factory vent covers on the rear collar and replace them with the TEMP-est fan and vent assemblies, then route the interconnect wire through the inside of the OTA behind the primary mirror and connect the wire to the other fan. A third "push-air-in" fan is now offered for the third CPC Deluxe vent hole as well for maximum air flow through the back of the OTA.
Fan Installation and Power Supply For
the Fans:
The
TEMP-est fans run on 12V DC power. The power supply I used to run the fans
was PN "PS-12"
from Scopestuff.com.
If you run your telescope on a 12 volt DC gel-cell or deep-cycle battery, the
standard *Meade-spec* (this is not a misprint....Meade, not Celestron) battery
cable will work fine on the rear and front TEMP-est fans, as
well as the Starizona Cool-Edge front fan. PN "CC12" with its
2.5mm I.D. tip size from Scopestuff.com will fit the fans' power sockets.
Image of the TEMP-est rear collar fans, installed on the Celestron CPC EdgeHD 11
inch OTA:
 |
V. Conclusions:
1)
The improvement in wavefront quality from the use of the forced-cooling fans is
very evident in the above Roddier wavefront analysis.
2) The beneficial effects at the eyepiece for high-magnitude, serious
planetary work were evident from the use of *continuous* rear-collar fans
*while* observing. The visual testing confirmed that using a rear fan
setup is superior at *keeping* the OTA better-stabilized compared to just using
a front fan only, then no fans during the rest of the session. Without
continuous fan help, due to the imbalance in cooling coefficients between the
aluminum OTA surface and primary mirror glass, eventually, even with tube
insulation such as felt flocking, the internal thermals will regenerate on
fast-dropping temps if some type of continuous fan solution is not used.
The TEMP-est rear fans definitely did the job very well of drawing away residual
heat from the back of the primary mirror glass and maintaining the OTA
equalization that had been gained from using the front fan initially to begin
the session. I highly recommend the rear fans for any Celestron OTA owners
having the EdgeHD tubes or newer "CGE-Pro"-style standard tubes that
have rear vent holes. The use of either a front fan solution such as the
Starizona fan or the companion TEMP-est front Fastar fan should be strongly
considered for Celestron Fastar-equipped SCT telescopes that are going to be
used for serious planetary work. For older non-EdgeHD Celestron SCT's that
don't have factory rear-collar vents or a Fastar assembly in the front, the
Lymax Cat Cooler fan is an effective substitute for the front fan solutions from
DeepSpaceProducts.com and Starizona.
3) The TEMP-est "maglev" rear fan design produced no detectable
vibration at the eyepiece or camera's focal plane. This is crucial because
it allows the rear fans to be used continuously *while* observing to improve OTA
thermal stability.
***DISCLAIMER*** I am not responsible for any damage you do to your telescope from attempting to make the modifications described here. If you decide to modify your own telescope, you do so at your OWN risk to the OTA and the factory warranty. Also, it is important to keep in mind that no two telescopes, even of the same model, are exactly the same in build or performance, especially mass-produced SCT's like the instrument described here. So your test results might vary widely from my results. Likewise, one's ability to disassemble, reassemble, and re-adjust the OTA to maximum performance will vary from user to user. Therefore, I make no claims or guarantees that your telescope's performance will be improved by making any of the modifications to it that are described here.
Wade Van Arsdale
December 21st, 2011
Little Rock, AR., USA